If you’re looking for detailed information regarding each of the activities included in this Getting Started With Morning Work packet, please click on the link below to see the corresponding blog post.
This post does contain some affiliate links for your shopping convenience. I do receive a small commission when someone purchases an item after clicking on a link. These commissions help with the cost of maintaining this blog and allow me to continue bringing you valuable content, activities, and ideas.
Getting Started With Morning Work
Materials Used In Activities
I always encourage teachers to use what they have or use what’s cheap. However, there are always teachers who would like to locate specific items that I may have used in activities. So I created a list below to help. Just click on any highlighted text to see where I secured various items.
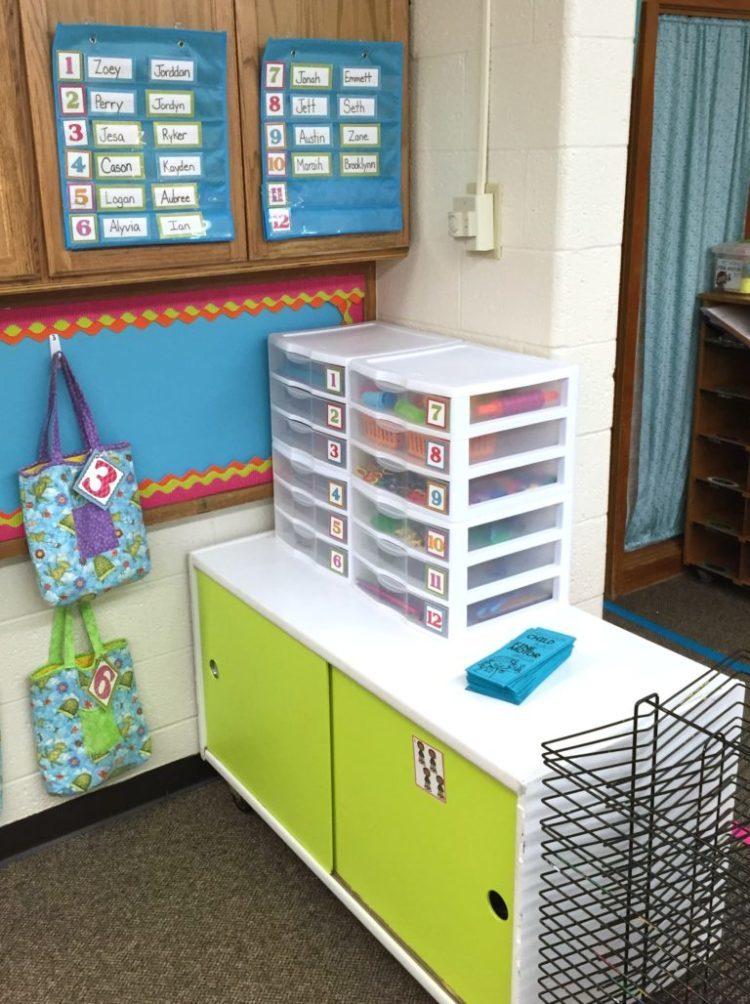
Set-up

- 12 Drawer Unit – Amazon
- Small pocket charts – Target Dollar Spot
- Name cards – Getting Started with Morning Work packet
- Drawer numbers available in numbers 1-24 – Getting Started with Morning Work Set
ACTIVITIES
The activities below are the ones included in my Getting Started with Morning Work Packet. I have listed all the materials and tools you will need. Additionally, you will want to have access to a laminator, laminating sheets, colored Astrobrights paper, scissors and a stapler to put your activities together.
1. CUTTING WITH FANCY SCISSORS
- Colorful Astrobrights Paper
- Fancy Scissors
- I can sheet – available in packet
2. CUTTING STRAWS WITH SCISSORS
- Child-sized scissors
- Various colored straws – Dollar Tree or any grocery store
- I can sheet – available in packet
3. CUTTING ON LINES
- Child-sized scissors
- Cutting on lines sheets – available in packet
- I can sheet – available in packet
4. LINKING LINKS TOGETHER
- Plastic links
- I can sheet – available in packet
5. MEASURING ITEMS WITH LINKS
- Plastic links
- Items to measure (Use items around your classroom)
or
- Measuring cards – available in packet
- Dry erase marker
- I can sheet – available in packet
6. USE LINKS TO LINK THE LETTERS IN YOUR NAME
- Plastic links
- Linking Alphabet cards, laminated, cut apart and with holes punched – available in packet
- I can sheet – available in packet
- Hole punch
7. USE LINKS TO LINK NUMBERS IN ORDER
- Plastics links
- Linking Number cards, laminated, cut apart and with holes punched on either side – available in packet
- Hole punch
- I can sheet – available in packet
8. USE LINKS TO LINK LETTERS IN ORDER
- Plastic links
- Linking Alphabet cards laminated, cut apart and with holes punched – available in this packet
- Hole punch
- I can sheet – available in packet
9. USE HOLE PUNCH TO PUNCH HOLES IN PAPER
- Hand hole punch
- Astrobright bright paper strips
- I can sheet – available in packet
10. USE HOLE PUNCH TO PUNCH HOLES IN PAPER TO REPRESENT NUMBER INDICATED IN HOLE PUNCH NUMBER BOOK
- Various button hole punches or lever hole punches
- Hole punch number book cut and assembled with staple – available in packet
- I can sheet – available in this packet
11. USE PAPER HOLE PUNCH TO PUNCH OUT THE LETTERS THAT DO NOT REPRESENT THE BEGINNING LETTER SOUND ON PAPER STRIP
- Traditional hole punch – one for each child at station
- Beginning letter sound punch strips printed on bright Astrobrights paper and cut into strips – available in packet
- I can sheet – available in packet
12. USE DOUGH TO MAKE LETTERS
- Play-doh or another type of kindergarten friendly dough
- Play-doh letter mats, laminated and cut apart – available in packet
- I can sheet -available in packet
13. USE DOUGH TO MAKE LETTERS IN MY NAME
- Play-doh or another type of kindergarten friendly dough
- Play-doh name mats, laminated and cut apart – available in this packet
- I can sheet – available in packet
14. USE EXTRUDER TO SQUEEE DOUGH AND CUT WITH SCISSORS
- Play-doh or another type of kindergarten friendly dough
- Play-doh extruders
- Play-doh scissors or other child-sized scissors
- I can sheet – available in packet
15. MATCH NUTS AND BOLTS
- Nuts and bolts in various sizes
- I can sheet – available in packet
16. CONNECT POP BEADS TOGETHER
- Plastic pop beads
- I can sheet – available in packet
17. MEASURE ITEMS WITH POP BEADS
- Plastic pop beads
- Items from around your classroom or the item measuring cards, laminated and cut apart – available in packet
- Dry erase marker
- I can sheet – available in packet
18. CONNECT POP BEADS TO MAKE PATTERNS
- Plastic pop beads
- Pop bead, self-correcting pattern cards, laminated and cut apart – available in packet
- Cards are secured with a clothespin
- I can sheet – available in packet
19. USE PUSH PIN TO FOLLOW DOTTED LINES OF A PICTURE
- Push Pin
- Pokey pin picture sheets, stapled to the front of a colored sheet of paper – Mrs. Miner’s Monkey Business
- Eraser to ‘park’ push pin when not in use
- Colored paper
- I can sheet – available in packet
20. USE PUSH PIN TO FOLLOW THE DOTTED LINES TO MAKE THE LETTERS IN YOUR NAME
- Push Pin
- Editable, push pin name sheets, stapled to the front of a colored piece of paper – available in this packet
- Eraser to ‘park’ push pin when not in use
- Colored paper
- I can sheet – available in packet
21. USE PUSH PIN TO FOLLOW THE LINES OF LETTERS
- Push pin
- Pokey pin letter sheets, stapled to the front of a colored piece of paper – Mrs. Miner’s Monkey Business
- Eraser to ‘park’ push pin when not in use
- Colored paper
- I can sheet – available in packet
22. FIND OBJECTS HIDDEN IN THERAPY PUTTY
- Three to four containers of Therapy Putty
- Small plastic objects that will hide easily in putty such as pony beads or jewels
- I can sheet – available in packet
23. FIND OBJECTS HIDDEN IN THERAPY PUTTY AND SORT BY SHAPE
- Three or four containers of Therapy Putty
- Small various shaped ‘jewels’
- Sorting dish such as an ice cube tray
- Shape labels for sorting dish – available in packet
- I can sheet – available in packet
24. FIND OBJECTS HIDDEN IN PUTTY AND SORT BY COLOR
- Three or four containers of Therapy Putty
- Small various colored ‘jewels’
- Sorting dish such as a relish or ice cube tray
- Color labels for sorting dish – available in packet
- I can sheet – available in packet
25. ROLL THE DICE AND USE TONGS TO MOVE FROGS TO LILY PAD
- Small plastic frogs
- Foam or paper lily pads (one for each player) – template and paper lily pads available in packet
- 1 dice
- Tongs
- I can sheet – available in packet
26. USE TONGS TO SORT POMPOMS BY COLOR
- Various colored pompoms
- Sorting dish
- Color labels for sorting dish – available in packet
- Tongs
27. USE TONGS TO MAKE THE LETTERS ON THE LETTER MAT
- Play-doh letter mats, laminated and cut apart – available in this packet
- Tongs
- Mini-erasers – seasonal ones available at Target or Amazon
- I can sheet – available in packet
28. USE TONGS TO MAKE THE LETTERS IN YOUR NAME
- Editable name sheets for use with tongs, laminated and cut apart – available in packet
- Tongs
- Mini-erasers – seasonal ones available at Target or Amazon
- I can sheet – available in packet
29. USE A COTTON SWAB TO TRACE THE LETTERS IN YOUR NAME
- Cotton swabs
- Various washable tempera paint
- Editable cotton swab dot name sheet – available in packet
- I can sheet – available in packet
30. USE STICKERS TO MAKE THE LETTERS IN YOUR NAME
- Small thematic stickers or simple small dot stickers
- Editable sticker name sheets – available in packet
- I can sheet – available in packet
31. SORT GEL BEADS BY COLOR
- Various colored gel beads
- Color sorting labels for sorting dish – available in packet
- Sorting dish, ice cube or relish tray
- Light table (optional)
- I can sheet -available in packet
32. SCOOP, SORT AND CONNECT BLOCKS TO MATCHING COLORED BASE
- Various colored Lego pieces
- Various colored Lego bases
- Small plastic scoop- Dollar Tree
- I can sheet – available in packet
33. USE PLASTIC TOOL TO MAKE DESIGNS
- Plastic Spirograph-type tool
- Gel pens in various colors
- Paper
- I can sheet – available in packet
34. ROLL THE DICE AND SQUEEZE THE MONSTER TO FEED HIM
- One tennis ball monster for each child
- Tennis ball or pet tennis ball with slit cut for the mouth
- Google eyes
- Small items such as pony beads or thematic mini erasers to use as pretend ‘food’
- Dice
- I can sheet – available in packet
And that is all that you need for this first set of Morning Stations. If you have questions, please do not hesitate to contact me. I have used these stations in my own room for several years so I have tons of experience with any roadblock or question that may occur.

