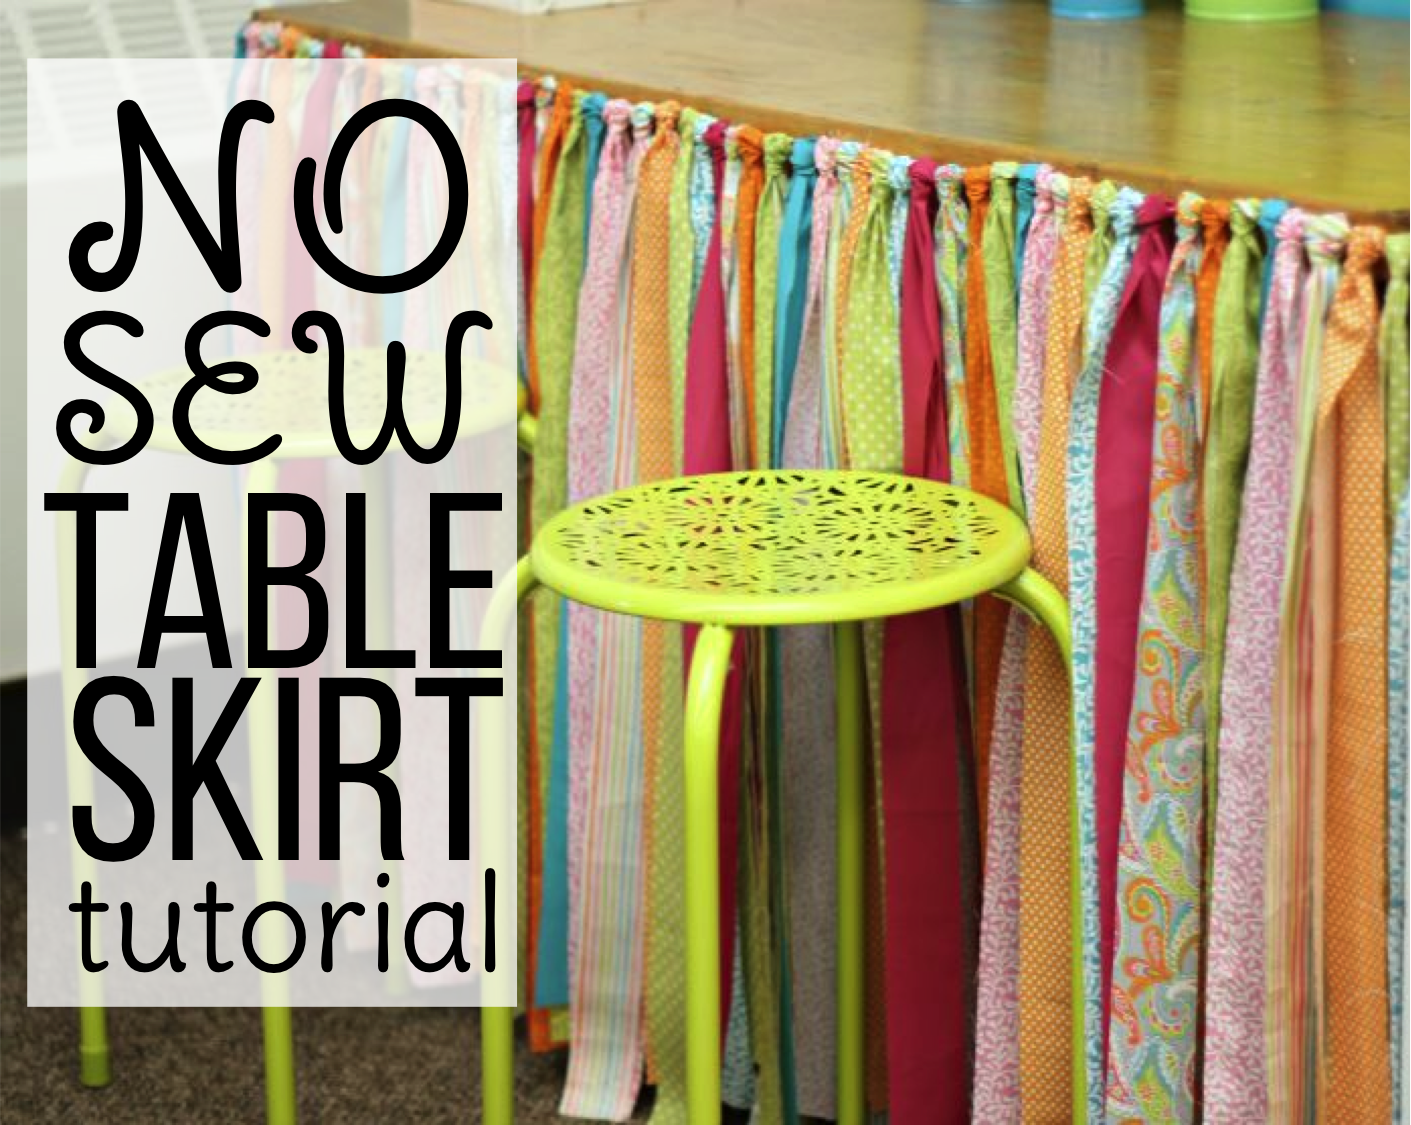
No Sew Table Skirt Tutorial
THE PROBLEM
So, I had to take matters into my own hands. I couldn’t take it anymore. My poor school is an old one and, as such, it has old furniture. I’ve replaced quite a bit of it little by little, but I these old tables are still around and a definite eye-sore.

The other problem . . . storage. You can see all my totes that I keep sensory items in under the tables.

I needed to hide that clutter. It’s bad enough that I know it’s there. I didn’t want everyone else seeing it. Table skirts would do the trick, but I wanted something ‘no sew’ and easy. It’s not like I have a sewing machine sitting in my basement collecting dust . . . ok, I have two. But I just wanted something a little different. I thought you all could maybe use one of these too, so I went ahead and created this little ‘no sew table skirt tutorial’ to help you out.
Before I start, I have to tell you, I did not come up with the knotting idea. There are knotted valances and bunting all over Pinterest and the blogging world, so I’m not really sure who to credit, but I just want to put that out there so no one thinks I came up with this. It’s kind of been going on forever, but this is kind of my version of taking it and putting it to work as a table skirt in my classroom.
MATERIALS AND SET-UP
- 4 yards of fabric
- 1 3/4 yards of grosgrain ribbon
- Heavy Duty Stapler or Staple Gun (a glue gun would probably work in a pinch)
- 2 binder clips
- fabric scissors

Before you get started you are going to want to take some measurements of the table you plan on skirting. This particular table was about 24 inches tall and 48 inches wide. I did not plan on covering the entire table, so I only needed enough material to cover the front and a couple of inches of each side as they wrapped around. No one will see the sides or the back so there was really no point. 
For this particular table, it took about 65 strips of 2 inch material, each at about 48 inches in length. What that means if you’re not a seamstress and not knowing that material comes in 45 inch width strips is that you are going to need a total of about 4 yards of material. You can get all one color at 4 yards, or break it up into to three different colors. However you must have a minimum of 48 inches length for each piece (or 1.3 yards). I happened to use something like ten different patterns, because I knew I would be doing a couple of additional pieces of furniture.


Once you’ve cut all your strips out, you’re ready to get started.
PUTTING IT TOGETHER
Once all your fabric is cut out, the rest of the skirt goes fairly quickly. You tend to get into a rhythm, but it’s one of those projects you can do a little bit and come back to with no problem.

To set yourself up, get your ribbon and tie a knot at the two ends. Then clip your ribbon between two chairs. You’ll be tying the fabric to the ribbon.
First you will want to lay the fabric so it has a loop towards the back of the ribbon like so.

Then take the ends of the fabric that are closest to you and send them backwards, under the ribbon and up through the loop.

When you pull those ends through . . .

. . . they will form a little knot that looks just like a tie when it’s still fat like the one below.

Now take the ends and pull on them, working them into a tighter (but not super tight) knot. . .

. . . like the one below. You’ll want to try to make all your knots are about the same size and tightness to keep your skirt looking uniform.

Did you get it? Ok then, more time in double time . . .

ATTACHING IT

So what you will end up with is a long ribbon of ties like the one above. Now the trick it so get it attached to your table. This took some thinking on my part. I tried two different methods that worked.
First I used one of those giant stapler that you can get at a building store. My husband had one lying around so I grabbed it and gave it a try.

It worked fairly well, but I had trouble controlling it, because my hands were kind of small and it took a lot of effort to squeeze it. (I think I need some fine motor activities to build up my muscles or something!) Then I remembered that I had my dad’s electric upholstery stapler. It’s the same thing I used to cover my stools and what I used for recovering my office chair in THIS tutorial.

Now THAT was easy. I could easily control where the staples went in, just press the button and BAM! They didn’t balk a bit at the hard table wood. I just made sure that I stapled the ribbon between two knots and moved the knots over the staple to hide it. Viola. Now I didn’t try a glue gun, and I’m sure it would stick the ribbon in place. I’m just not sure how it would work for little bodies if they happened to tug on it. With the staples, I know that skirt isn’t going anywhere.
THE OBSESSION
And the final product . . .

Not bad at all if I do say so myself. And it definitely made a HUGE difference.

As you probably guessed. I didn’t just stop with covering a table for class though. This little knotted bunting obsession had me covering my cupboards (this one uses a pressure rod) and again covers my clutter . . .

. . . and I made a little valance for my window.

You can totally see that nothing is perfect about these pieces, and that’s kind of why I love them. No pressure, no stress . . . just cute! I still have ONE big project I want to do, but I’ll wait to show you that one when it’s done. I hope you take the plunge and try covering one of your own tables. Drop me a note, and let me know what you think. Share this posts with a friend if you think they may be interested in covering a table in their classroom. I’m anxious to hear how it goes, and please, you know you can drop me a line if you have any questions.
For more classroom decorating ideas, check out my Pinterest Board and make sure you follow me.
Follow Marsha McGuire (Differentiated Kindergarten)’s board Classroom Decorations on Pinterest.
Share This:

Marsha Moffit McGuire
Short little bio goes here. Short, sweet, and lets visitors know about your experience, expertise, etc.


Leave a Reply